BTC Swinger v1Daily interval swing trading algorithm based on momentum techniques using ATR Stops. Made by Kory Hoang from Stably.
Shout out to the Advanced Crypto Asset Trading crew! ;)
Cari skrip untuk "daily"
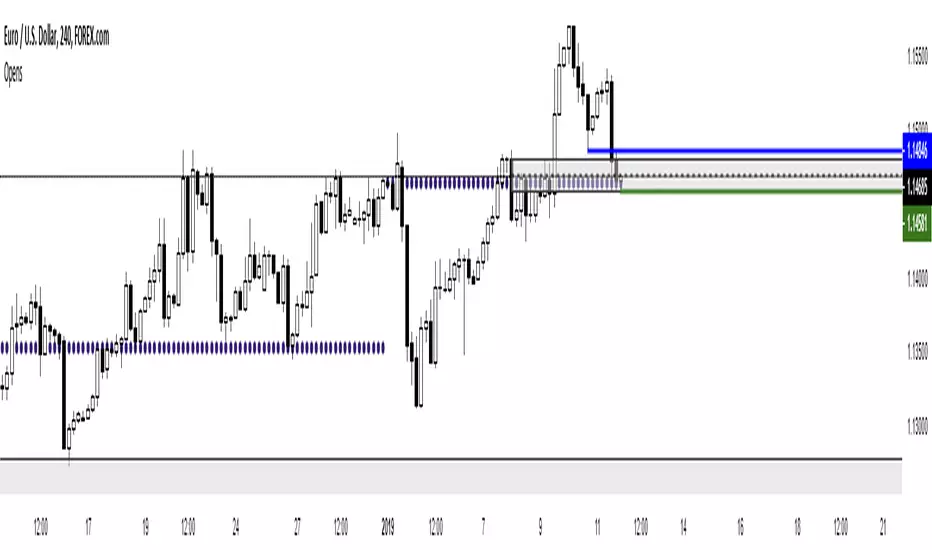
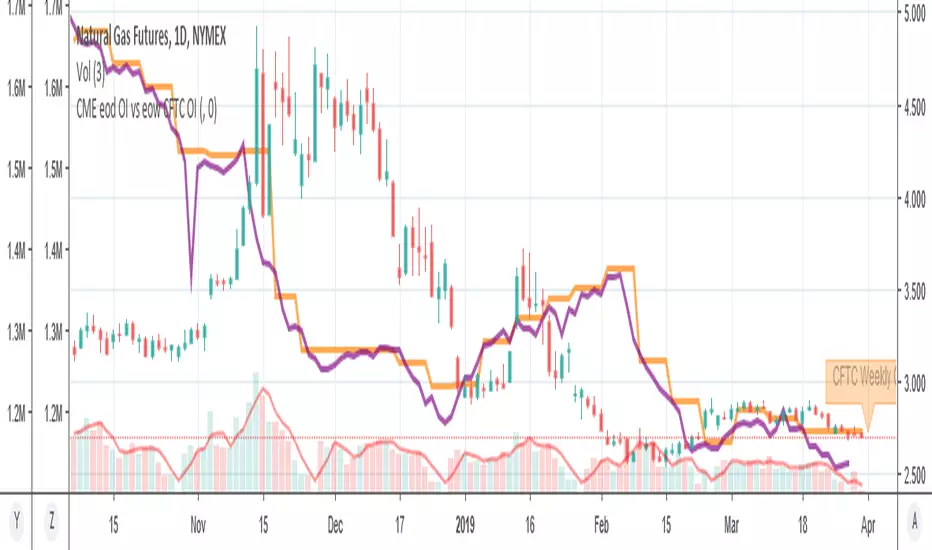
MY_CME eod OI vs CFTC eow OIDaily e-o-d Open Interest as published by CME.
As CFTC COT Open Interest relates to last Tuesday, here you can have an idea how things evolved day-by-day since then.
As CME total OI is not accessibl as data, here I sum OI of the next 9 outstanding contracts, which gives a fair idea of the trend in OI
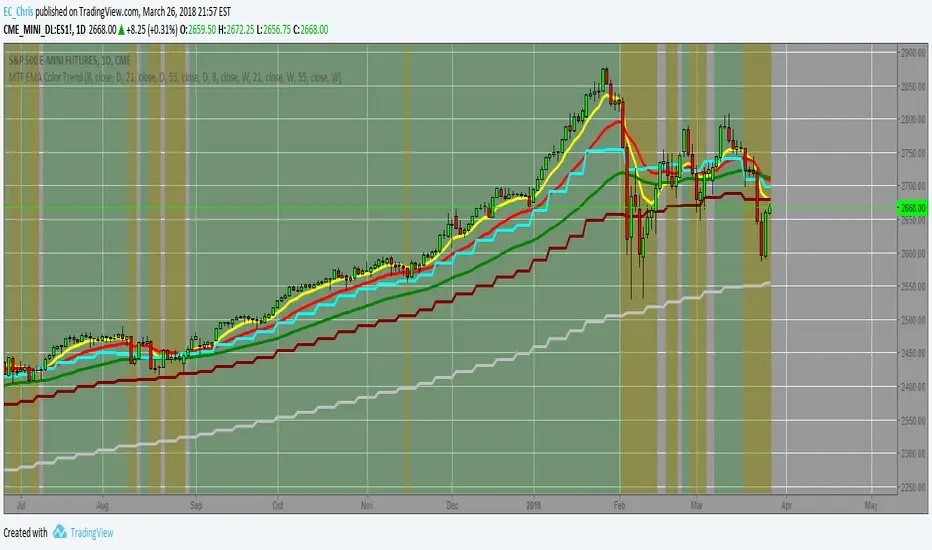
MTF EMA Combo with Background ColorDaily/Weekly EMA combo for longer term trend direction, with combo background color for varying trend direction.
Daily Average True Range OverlayPlots the upper and lower average true range away from the previous days close on all time frames.
Daily Deviations (Lazy Edition)
Plots the standard deviation resistance/support lines.
Uses Previous days close and the VIX as the volatility factor.
credit to u/UberBotMan and u/Living_Granger for the idea and formulas
Daily Deviations (Self Input Version)
Plots the standard deviation resistance/support levels.
Input the previous settlement price and the implied volatility.
credit to u/UberBotMan and u/Living_Granger for the idea and formulas
(preview example is using settlement of 2420 and IV of 11)
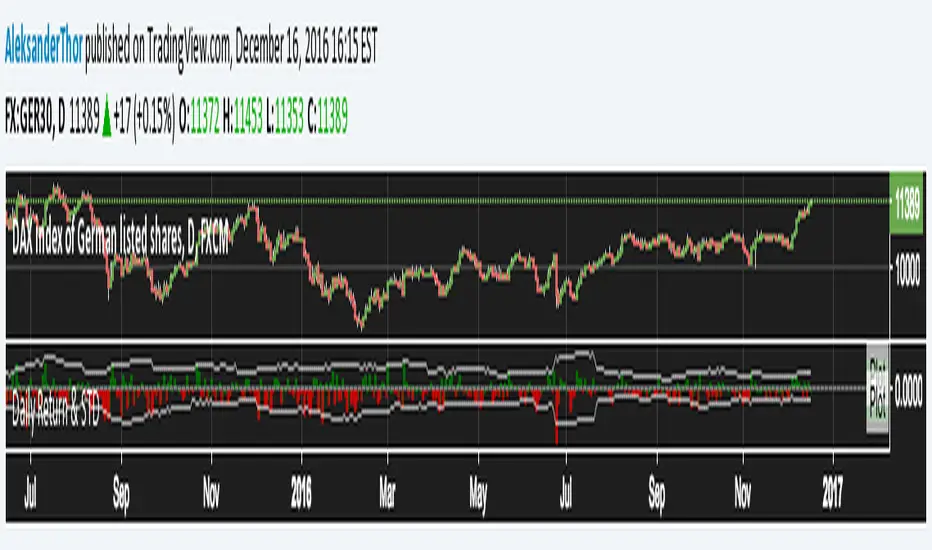
Daily Returns & STDWhat happened last time when xx increased by xx%? - Start collecting some stats!
You can choose the ticker and the timeframe you're interested in
RSI Oversold/UndersoldThe study script will place GREEN BUY arrows BELOW oversold conditions and RED SHORT arrows ABOVE overbought conditions. You can configure the period
Most RSI(14) indicators use a 14-period, I prefer a 5-period. The period, overbought and oversold periods are settings that can easily be changed by adding this study to your chart and clicking the "gear" icon next to the study inside your chart.
Daily SMAThis pine script on intraday chart is exactly the same SMA as built-in MovingAverage on a 1Day chart (with the same lengths)
SA Range Rank WITH GRADE A SET UP 15 MIN NQI APPRECIATE YOUR SUPPORT PLEASE MESSAGE ME FOR ACCESS TO DIRECT AND POWERFUL SIGNALS. MORE TO COME !
NOTICE DEVELOPER NOTE: chatgpt.com
15 MINUTE — PREPARE / POSITION MODE
Developer Note: Bias & Position Framing
This daily view is preparatory, not executable.
The purpose of the Daily timeframe is to define directional bias, not entries. It helps frame which side of the market deserves attention and which activity should be ignored.
The goal here is context, not action.
---
Purpose on Daily
The Daily timeframe is used to:
· Define directional bias for the week
· Prepare position-building zones
· Identify environments where participation is unnecessary or elevated-risk
· Reduce overtrading by narrowing focus
Daily charts answer one question only:
“If I participate this week, which side makes sense?”
---
What Matters Most (Public View)
SA Range Indicator (RI): → Is the market transitioning or trending? → Is energy building, releasing, or rotating?
SA ZoneEngine (visual context only): → Are daily moves aligned with higher-timeframe structure? → Is price operating with or against dominant bias?
These visuals explain environment, not decisions.
---
How to Interpret Public Daily Posts
· Daily is not timing
· Daily is not execution
· Daily is not a signal
Daily charts prepare the trader mentally and structurally by clarifying:
· what deserves patience
· what deserves caution
· what deserves no attention at all
---
Messaging Line
“Daily charts prepare the trade — they don’t execute it.”
---
SEO Intent
daily equity bias, position preparation, market structure analysis
---
For Those Who Find Value
If these daily posts help you see the market more clearly:
· Follow, boost, and share my scripts, Ideas, and MINDS posts
· Feel free to message me directly with questions or build requests
· Constructive feedback and collaboration are always welcome
For traders who want to go deeper, optional memberships may include:
· Additional signal access
· Early previews
· Occasional free tools and upgrades
Membership & Signals trianchor.gumroad.com
---
---
⏱ 15-MIN — PREPARE / POSITION MODE
Developer Note: Setup Formation Phase
The 15-minute timeframe is where setups begin to form, not where they are acted on.
This view exists to separate developing structure from noise.
---
Purpose on 15-Minute
The 15-minute timeframe is used to:
· Spot trap-prone conditions
· Identify developing structure
· Observe compression, rotation, or early expansion
· Prepare for execution — without acting
This timeframe answers a different question:
“Is something forming — or is this noise?”
---
What Matters Most (Public View)
SA Range Indicator (RI): → Compression → expansion transitions → Energy buildup vs premature release
SA CloudRegimes (visual only): → Whether price behavior reflects continuation, pullback, or contraction → Whether movement is controlled or impulsive
These visuals describe behavior, not entries.
---
How to Interpret Public 15-Minute Posts
· 15m is setup formation
· 15m is environmental awareness
· 15m is not execution
Most errors occur when traders act before structure has finished forming.
This timeframe exists to slow that impulse down.
---
Messaging Line
“Preparation happens before the move — not during it.”
---
---
For Those Who Find Value
If these posts help you better recognize developing structure:
· Follow, boost, and share my scripts, Ideas, and MINDS posts
· Feel free to message me directly with questions or build requests
· Constructive feedback and collaboration are always welcome
For traders who want to go deeper, optional memberships may include:
· Additional signal access
· Early previews
· Occasional free tools and upgrades
Membership & Signals trianchor.gumroad.com
15 Minute (15m) — Tactical Entry Alignment / “Permission + Timing”
Goal: Convert higher-timeframe permission into tradable timing.
How to use:
· Trade the first clean reclaim after a pullback.
· Avoid taking a reclaim if price is already extended far beyond the wake edge (late reclaim).
Best conditions:
· Works extremely well when:
o 1H agrees
o session structure is active (open/close windows)
o reclaim occurs near VWAP or a key level you already respect
Settings:
· dispMult 0.75–1.05
· reclaimWindow 6–14
· cooldown 3–6
15-MINUTE — Intraday Structure & Session Logic
Range Indicator (RI)
· Session compression → impulse likely
· Expansion → follow, don’t fade
Use: Defines session behavior.
---
ZoneEngine (Structure)
· Filters session traps
· Explains failed breakouts
Use: Keeps you aligned with real participation.
---
Cloud / Reclaim (Behavior)
· Identifies pullback vs continuation
· Reclaim confirms acceptance
Use: Contextual confirmation.
---
Stop-Hunt Proxy
· Session liquidity sweeps
· Common near opens and transitions
Use: Stop-hunt + compression = likely session impulse.Execution Confirmation (Chart TF)
VWAP location
SMA(3) vs SMA(8)
Candle color (green/red)
WAIT State (NO CONFIRMED TRADE)
When the market is in a specific “trap regime,” the script blocks trades completely.
Grade-A setups (the only ones you trade)
✅ Grade-A Long = B+ Confirmed
A B+ print is your “Grade-A Long permission + execution alignment.”
B+ only fires when ALL are true:
Bull Permission is ON (macro score meets threshold)
WAIT is OFF
Candle is green (close > open)
Price is ABOVE VWAP
SMA(3) > SMA(8)
Translation:
Liquidity + rates are supportive, the market is positioned to move up, and price is already trading like institutions are pressing.
✅ Grade-A Short = B− Confirmed
A B− print is your “Grade-A Short permission + execution alignment.”
B− only fires when ALL are true:
Bear Permission is ON
WAIT is OFF
Candle is red (close < open)
Price is BELOW VWAP
SMA(3) < SMA(8)
Translation:
Liquidity + rates are pressuring, volatility is supportive of downside, and price is already trading under VWAP with downside momentum.
🟫 WAIT State = NO CONFIRMED TRADE
When the background turns gray (WAIT), you do nothing.
WAIT is the regime where:
downside breaks often fail
signals become unreliable
stop-hunts and reversals dominate
Your rule is simple:
WAIT = stand down until it clears.
This prevents “getting chopped to death” in the exact environment you identified as misdirection.
Step-by-step: how to use it on TradingView
Step 1 — Put it on the right instruments
Best use:
CME_MINI:NQ1! (primary)
CME_MINI:ES1!
CBOT_MINI:YM1!
CME_MINI:RTY1!
Works on equities too (SPY, QQQ, NVDA, AAPL), but it’s tuned for futures execution.
Step 2 — Use the right timeframes (this matters)
Best “Grade-A” workflow:
Chart TF (execution): 5m or 15m
Confirm TF (macro permission): 60m or 240m
Settings:
Confirm TF (intraday) = 60 for aggressive /NQ
Confirm TF = 240 for cleaner, fewer signals
If you want fewer but stronger signals: 240.
Step 3 — Confirm the data sources are valid
In Inputs:
Vol: CBOE:VIX
Dollar: TVC:DXY
Rates: CBOT:ZN1!
If that doesn’t work on your feed, change to TVC:US10Y
If these are wrong, the macro layer goes blind and signals degrade.
Step 4 — Interpret the background (your “regime map”)
Gray background: WAIT (do nothing)
Light green background: bull permission environment
Light red background: bear permission environment
Important:
Background alone is not a trade.
Only B+ / B− is a trade.
Step 5 — Execute ONLY on B+ / B− (Grade-A rule)
You do not anticipate.
You do not guess.
You do not trade “almost.”
You enter only when the indicator prints:
B+ for long
B− for short
Because those prints already include:
macro permission
VWAP location
SMA momentum alignment
candle confirmation
and WAIT suppression
Trade management (simple + effective)
For B+ (Long)
Entry: on the B+ bar close or next candle pullback that stays above VWAP
Invalidation: close back below VWAP or SMA3 falls under SMA8
Best targets (futures):
Target 1: recent swing high / session high
Target 2: VWAP band extension / next liquidity level
Hard stop: under last swing low (or your fixed points)
For B− (Short)
Entry: on the B− bar close or next candle retest that stays below VWAP
Invalidation: close back above VWAP or SMA3 crosses above SMA8
Best targets:
Target 1: recent swing low / session low
Target 2: next liquidity shelf / range low
Your “Grade-A Checklist” (print this mentally)
Before taking ANY trade:
Is WAIT OFF?
Did we get a B+ or B− print?
Is price on the correct side of VWAP?
Is SMA3 vs SMA8 aligned?
Is the candle color correct (green for B+, red for B−)?
If yes → take it.
If not → do nothing.
Why this works (the edge)
This indicator forces you to trade only when:
macro conditions allow follow-through
price action confirms institutional control (VWAP)
momentum confirms continuation (3/8 SMA)
and it blocks trades during the mischief regime (WAIT)
That combination is exactly what stops:
revenge trades
chop entries
shorting into bear traps
longing into liquidity tightening
Recommended default settings (Grade-A clean)
For /NQ:
Chart: 5m
Confirm TF: 60m
onlyOnFlip: true (less noise)
Keep VIX/DXY/ZN defaults
For “super clean”:
Chart: 15m
Confirm TF: 240m
Blockcircle Global Central Bank Balance Sheet and Money SupplyOVERVIEW
This indicator aggregates money supply (M2) and central bank balance sheet data from the world's largest economies into a single, unified view of global liquidity conditions. Rather than manually tracking dozens of separate data feeds or building your own aggregation logic, you get a ready-to-use tool that pulls from FRED, TradingView Economics, and real-time FX rates to convert everything into USD terms automatically.
Global liquidity has historically served as a leading indicator for risk assets. When central banks expand their balance sheets and the money supply grows, capital tends to flow into equities, crypto, and other risk-on assets. When liquidity contracts, markets often follow. This indicator gives you that macro context directly on your chart.
The global liquidity movement (expansionary or contractionary) often leads to asset price appreciation/depreciation in CRYPTOCAP:BTC , SP:SPX , etc
WHAT MAKES IT ORIGINAL AND DIFFERENT
Combines both M2 money supply AND central bank balance sheet data in one place, whereas most existing tools focus on only one metric
Aggregates 11 economies for M2 (USA, EU, China, Japan, UK, Canada, India, Russia, Brazil, Australia, Switzerland) and 10 central banks for balance sheet data
Automatically handles currency conversion using live FX rates so all values display in USD
Includes a dedicated US Net Liquidity calculation (Fed Balance Sheet minus Reverse Repo minus TGA) which filters out temporary distortions that other aggregate tools ignore
Provides granular country by country breakdown in the information table so you can identify which central banks are driving the aggregate trend
Offers four moving average types (SMA, EMA, WMA, RMA) for trend smoothing with configurable length
HOW IT WORKS
The indicator requests monthly M2 data from TradingView's Economics feeds for each included country. Central bank balance sheet data is pulled the same way. All non-USD values are converted using daily FX rates from major currency pairs. The script then sums these converted values to produce the Global M2 and Global CBBS lines.
For US liquidity specifically, the script pulls weekly data for the Reverse Repo Program (RRP) and Treasury General Account (TGA) from FRED. Net Liquidity is calculated as: Fed Balance Sheet minus RRP minus TGA. This formula removes funds parked in reverse repos and Treasury cash balances, showing what is actually circulating in the financial system.
KEY FEATURES
Global M2 Money Supply line tracking 11 major economies with individual toggles for each country
Global Central Bank Balance Sheet line tracking 10 central banks with individual toggles
US-specific components, including Reverse Repo, TGA, and Net Liquidity as separate plot lines
Moving average overlays with selectable type and length for identifying trend direction
Fill the option between M2 and CBBS lines to visualize the gap between money supply and central bank assets
Value labels at line endpoints showing current readings and period-over-period percentage change
Comprehensive information table with optional country breakdown view
Full color customization for all lines, configurable line width, and style options
Alert conditions for significant M2 and CBBS changes plus MA crossover signals
HOW TO USE
Add to any chart and observe the overall direction of global liquidity. Rising lines generally support risk on positioning, while declining lines suggest caution
Watch for divergences between the M2 and CBBS lines. If money supply grows faster than central bank assets, private credit may be expanding. If CBBS rises faster, central banks are actively injecting liquidity
Use the US Net Liquidity line to understand short term dollar liquidity conditions separate from longer term global trends
Enable moving averages to filter noise and identify when liquidity trends are changing direction
Toggle individual countries on or off in the settings to see how specific regions contribute to the total
Reference the information table for exact values and percentage changes without leaving your chart
SETTINGS BREAKDOWN
Table Settings: position, text size, and whether to show the country breakdown
Display Settings: toggle visibility for each line, fill area, value labels, percent labels, and the info table
Line Styling: customize colors for each metric, adjust line width, and select solid, dashed, or dotted style
Moving Average: enable or disable MA overlays for M2 and CBBS, select MA type, and set length
Global M2 Countries: individually enable or disable each of the 11 economies
US Liquidity Components: toggle RRP and TGA data
Global CBBS Countries: individually enable or disable each of the 10 central banks
Alerts: set percentage threshold for change based alerts
IMPORTANT CONSIDERATIONS
Data updates depend on the publication schedule of each source. M2 and CBBS data are typically monthly with some delay. US Fed Balance Sheet, US RRP and US TGA update weekly
FX conversion uses daily close rates which may introduce minor discrepancies during volatile currency periods
Some emerging market data may have longer reporting lags than developed market data
Hope you find it useful and impactful to your trading and investment decisions! If you have any questions at all, please just ask, happy to help
Iron Fly SPX 0DTE Strategy🦋 Iron Fly 0DTE Strategy
A simple indicator that tells you when to open and close Iron Fly options trades on SPX. Get alerts, execute manually in your broker.
What Does This Do?
This indicator watches the market and sends you alerts:
"OPEN" alert = Good time to sell an Iron Fly at this strike
"CLOSE" alert = Time to close your position (take profit or cut loss)
"EXPIRED" alert = End of day, let it expire or close manually
You receive the exact strikes to trade. You execute in your broker.
What is an Iron Fly?
An Iron Fly is a bet that the price stays near a certain level until end of day.
You collect money upfront (premium). If price stays close to your strike, you keep most of it. If price moves too far, you lose money (but your loss is capped).
The Trade (4 legs):
SELL a Call at the strike (collect premium)
SELL a Put at the strike (collect premium)
BUY a Call above for protection (costs premium)
BUY a Put below for protection (costs premium)
Net result: You collect premium. Max profit if price closes exactly at strike. Max loss is limited by your protective wings.
For a detailed explanation with visuals, read: kriyafx.substack.com
How to Use
Step 1: Add to Chart
Add indicator to SPX or SPY chart (1-5 minute timeframe recommended)
Step 2: Set Up Alerts
Create alert: Condition = "Iron Fly 0DTE" → "Any alert() function call"
Step 3: Wait for OPEN Alert
When you get an alert like this:
🦋 OPEN IRON FLY
Strike: 6980
Wings: ±30 pts
Sell 6980 Call
Sell 6980 Put
Buy 7010 Call
Buy 6950 Put
Step 4: Execute in Your Broker
Open your options broker, find today's expiration (0DTE), and enter the 4-leg trade at the strikes shown. Check the premium you'll collect - make sure it's worth the risk.
Step 5: Wait for CLOSE Alert
The indicator monitors your position. When it's time to exit, you get:
🦋 CLOSE IRON FLY
Strike: 6980
Reason: Price moved up past exit threshold
Buy to Close 6980 Call
Buy to Close 6980 Put
Sell to Close 7010 Call
Sell to Close 6950 Put
Close your position in your broker.
The Status Panel
The box on your chart shows:
Positions - How many flies are currently open
Market - Is it a good time to trade? (GOOD/OK/RISKY/STOP)
Wings - Current suggested wing width
Exit @ - How far price can move before you should exit
Trades - How many trades today vs your daily limit
Settings Explained
Entry Aggressiveness
How often should new trades open?
LOW = Fewer trades, more selective (beginner friendly)
MID = Balanced (recommended)
HIGH = More trades, more active (experienced)
Exit Aggressiveness
How long to hold before exiting?
LOW = Exit early, smaller wins, protected (beginner friendly)
MID = Balanced hold time (recommended)
HIGH = Hold longer, bigger potential wins but more risk
Max Concurrent Flies
How many positions open at the same time? Start with 1-2.
Max Trades Per Day
Daily limit to prevent overtrading. Start with 5-10.
When Does It Work Best?
Sideways, choppy markets (price not trending hard)
Normal volatility days (not FOMC, CPI, or earnings)
US market hours (10 AM - 4 PM Eastern)
When Does It NOT Work?
Strong trending days (price keeps going one direction)
High volatility events (news releases)
When the indicator shows RISKY or STOP
Important: Check Your Premium!
The indicator tells you WHEN to trade and at WHAT strikes. It does NOT tell you the price.
Before entering any trade:
Check the premium in your broker
Make sure the credit received is worth the max loss risk
Consider bid-ask spreads (wider = harder to profit)
If the premium looks bad, skip the trade
Start Small
Paper trade first to understand the signals
Start with 1 fly at a time
Use Entry LOW + Exit LOW when learning
Only risk money you can afford to lose
Risk Warning
Options trading is risky. Iron Flies can lose money - your max loss is the wing width minus premium collected. This indicator gives signals, not guarantees.
This is educational, not financial advice
Past signals don't guarantee future results
You can lose your entire premium
Always know your max loss before entering
Learn More
Full strategy explanation with charts and examples:
kriyafx.substack.com
EMA 12HDesigned specifically for the **12-Hour (12H)** timeframe, this indicator offers a powerful setup for Swing Traders who want to capture significant market moves without the "noise" of lower timeframes or the lag of the Daily chart.
This script visualizes the interaction between a fast-moving momentum line (EMA 7) and a short-term trend baseline (EMA 21). This specific combination on the 12H chart is often considered a "Sweet Spot" for identifying multi-day trends in volatile markets like Crypto and Forex.
**Indicator Components:**
* **EMA 7 (Green Line):** The "Fast Momentum" line. By using a period of 7, this line hugs price action tightly. It acts as the immediate signal trigger, reacting swiftly to sudden bursts of buying or selling pressure.
* **EMA 21 (Dark Blue Line):** The "Trend Anchor." This serves as the baseline for the trend. As long as price remains respectful of the EMA 21, the current swing trend is considered intact.
**Why the 12H Timeframe?**
The 12-Hour chart is a professional timeframe that effectively filters out intraday fluctuation. A crossover on the 12H chart carries significantly more weight than on the 1H or 4H charts, often preceding major trend continuations or reversals that last for days or weeks.
**Trading Strategy Guide:**
1. **The Entry Signal (Crossover):**
* **Bullish Swing:** When the EMA 7 (Green) crosses **above** the EMA 21 (Blue). This indicates that immediate momentum has overpowered the recent average, signaling a potential start of an uptrend.
* **Bearish Swing:** When the EMA 7 (Green) crosses **below** the EMA 21 (Blue). This signals a breakdown in momentum and a potential start of a downtrend.
2. **Trend Confirmation:**
* **Strong Uptrend:** Price candles should close consistently above the Green line.
* **Strong Downtrend:** Price candles should close consistently below the Green line.
* **Warning Sign:** If price closes between the Green and Blue lines, the trend may be weakening or consolidating.
3. **The "Golden Gap":**
* Watch the space between the two lines. An expanding gap indicates high volatility and a strong trend. If the lines begin to merge, it suggests the market is losing momentum and entering a choppy phase—traders should exercise caution.
**Settings & Customization:**
* **Default:** Lengths are set to **7** and **21** to match the 12H aggressive swing strategy.
* **Customizable:** You can adjust the lengths in the input tab to experiment with other combinations (e.g., 9/21 or 10/20) depending on the asset's volatility.
**Disclaimer:**
Trading involves high risk. This indicator is a tool for technical analysis and should not be considered financial advice. Always use stop-losses and proper risk management.
EMA 4HThis indicator is a streamlined trend-following tool designed specifically for the **4-Hour (4H)** timeframe. It combines two key Exponential Moving Averages (EMA) to help traders identify short-term momentum and dynamic support/resistance levels with reduced noise.
**Key Components:**
* **EMA 9 (Green Line):** The "Trigger" line. It reacts quickly to price action, representing immediate short-term momentum.
* **EMA 21 (Dark Blue Line):** The "Trend" line. It serves as a dynamic support/resistance zone and acts as a filter to keep you on the right side of the trend.
**Why the 4H Timeframe?**
The 4-hour chart offers a sweet spot between the noise of lower timeframes (15m, 1H) and the lag of daily charts. This setup allows for swing trading and intraday positioning with higher reliability.
**How to Use This Strategy:**
1. **Trend Identification (Crossovers):**
* **Bullish Bias:** When the EMA 9 crosses **above** the EMA 21. Look for long positions.
* **Bearish Bias:** When the EMA 9 crosses **below** the EMA 21. Look for short positions.
2. **Dynamic Support & Resistance (Pullbacks):**
* In a strong trend, price often pulls back to test the area between the EMA 9 and EMA 21. This "zone" often acts as a high-value entry point if price action shows rejection (wicks).
3. **Trend Strength:**
* **Wide Gap:** If the space between the Green and Blue lines is expanding, the trend is strengthening.
* **Narrow Gap:** If the lines are flat or intertwining, the market is ranging (choppy). It is best to wait for a breakout.
**Settings:**
* Default inputs are set to **9** and **21**, optimized for H4.
* Fully customizable via the settings menu to fit other strategies or assets (Crypto, Forex, Stocks).
**Disclaimer:**
This script is for educational and technical analysis purposes only. Always manage your risk and use stop losses.
Weekly Open LinesIndicator marks the weekly open (UK GMT) and plots across the week.
Reports statistics on occurrence of returns to the open price.
Only works on the daily time-frame.
ZLT - Date and Time MarkerPine Script v5 indicator called “DateTime Marker” that overlays on the chart and marks bars whose timestamp matches a user-defined schedule. When a bar “matches,” it can draw:
a vertical line through the bar,
a label with a time/date string, and
a triangle marker below the bar (always plotted on matches).
What you can configure
Marker Type (the matching rule)
You choose one of five modes:
Every Minute
Inputs: everyNMinutes (default 15), minuteOffset (default 0)
Match condition: minute % everyNMinutes == minuteOffset
Example with defaults: marks bars at :00, :15, :30, :45 each hour.
Hourly
Inputs: everyNHours (default 4), hourlyMinute (default 0)
Match condition: hour % everyNHours == 0 AND minute == hourlyMinute
Example with defaults: marks bars at 00:00, 04:00, 08:00, 12:00, 16:00, 20:00 (at minute 00).
Daily Time
Inputs: dailyHour (default 10), dailyMinute (default 0)
Match condition: hour == dailyHour AND minute == dailyMinute
Example with defaults: marks 10:00 every day.
Weekly Day & Time
Inputs: weekDay (default Tuesday), weeklyHour (default 16), weeklyMinute (default 0)
It converts the weekday name to Pine’s dayofweek number via getDayNumber().
Match condition: dayofweek == targetDay AND hour == weeklyHour AND minute == weeklyMinute
Example with defaults: marks Tuesday 16:00.
Monthly Date & Time
Inputs: monthlyDay (default 2), monthlyHour (default 23), monthlyMinute (default 0)
Match condition: dayofmonth == monthlyDay AND hour == monthlyHour AND minute == monthlyMinute
Example with defaults: marks the 2nd day of each month at 23:00.
Visual settings
showLine: whether to draw the vertical line.
lineStyle: Solid/Dashed/Dotted (mapped to Pine line styles by getLineStyle()).
lineColor, lineWidth: styling for the line (width is rounded to an integer because Pine line width is integer).
showLabel: whether to draw a label.
labelColor: background color of the label (text is forced white).
What happens when a bar matches
When isMatch becomes true on a bar:
Vertical line: line.new() at that bar’s bar_index, from low to high, extended extend.both (so it spans the full chart vertically).
Label: label.new() at the bar’s high, with mode-specific text:
Minute/Hourly/Daily: "HH:mm"
Weekly: "Tuesday HH:mm" (or whatever day selected)
Monthly: "Day 2 - HH:mm" (or chosen day)
Triangle marker: plotshape() draws a triangle up below the bar on every match (this happens regardless of showLine / showLabel).
Important practical implications
This uses the bar’s exchange/chart time (TradingView’s time, hour, minute, etc.), so results depend on the symbol/session and chart timezone settings.
On timeframes coarser than 1 minute, “Every Minute” still checks only the bar’s timestamp minute value; it won’t mark intra-bar minutes that don’t exist as separate bars.
Because it can create many objects (lines/labels), it sets max_labels_count=500. Lines are not capped here, so very dense marking can still clutter the chart.
If you tell me your intended use (e.g., “mark NY open,” “mark every 15m candle close,” “mark macro events weekly”), I can point out whether the current matching logic fits that precisely or needs adjustments (sessions, timezones, avoiding duplicates, limiting lines, etc.).


