Cycle Analysis:
HWC: 🔼 Bullish
MWC: 🔽 Bearish
LWC: 🔽 Bearish
The mismatch between higher and lower cycles shows we're in a transitional phase — a potential pivot zone where the market is deciding whether to reverse or continue its correction.
Market Structure & Pattern:
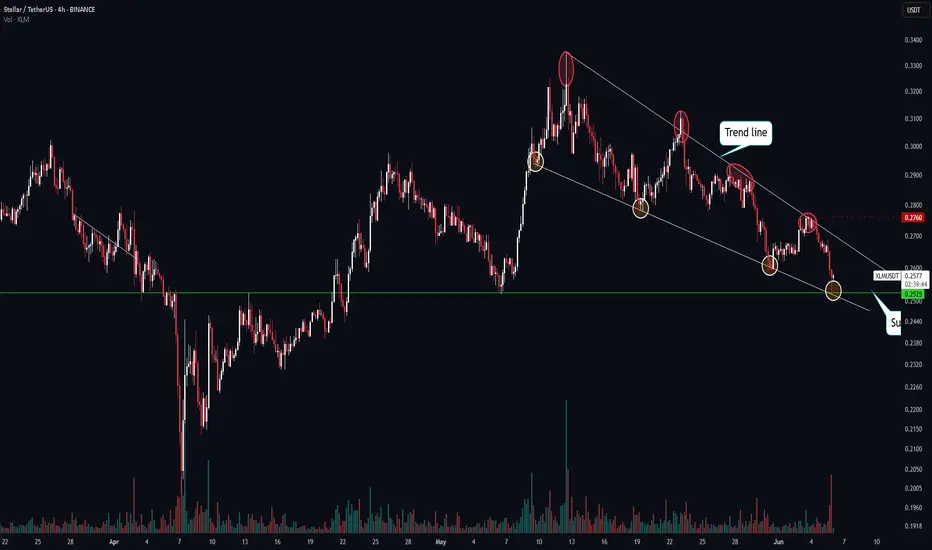
XLM is forming a clear compression pattern (either a triangle or falling wedge) with the following traits:
Upper trendline has been tested multiple times
Buyers show more pressure than sellers
Breakout to the upside looks more probable, aligning with the HWC direction
Entry Strategy:
If you're looking to enter, wait for a confirmed breakout above the pattern, ideally with:
A full-bodied 4H candle closing above the upper trendline
Volume spike supporting the breakout
Retest and successful bounce on the 15-min timeframe
📍 Stop-loss: Below the last local low
🎯 Target 1: Top of the MWC structure
🎯 Target 2: Full cycle alignment with HWC, if momentum continues
⚠️ Final Note:
Since MWC and LWC are still bearish, any long entry should be managed with tight risk control. A failed breakout could lead to a sweep of the lower range, though less likely based on current price action.
📌 Got a coin you'd like analyzed? Drop it in the comments.
⚠️ Without proper risk management, you're just a ticking time bomb.
HWC: 🔼 Bullish
MWC: 🔽 Bearish
LWC: 🔽 Bearish
The mismatch between higher and lower cycles shows we're in a transitional phase — a potential pivot zone where the market is deciding whether to reverse or continue its correction.
Market Structure & Pattern:
XLM is forming a clear compression pattern (either a triangle or falling wedge) with the following traits:
Upper trendline has been tested multiple times
Buyers show more pressure than sellers
Breakout to the upside looks more probable, aligning with the HWC direction
Entry Strategy:
If you're looking to enter, wait for a confirmed breakout above the pattern, ideally with:
A full-bodied 4H candle closing above the upper trendline
Volume spike supporting the breakout
Retest and successful bounce on the 15-min timeframe
📍 Stop-loss: Below the last local low
🎯 Target 1: Top of the MWC structure
🎯 Target 2: Full cycle alignment with HWC, if momentum continues
⚠️ Final Note:
Since MWC and LWC are still bearish, any long entry should be managed with tight risk control. A failed breakout could lead to a sweep of the lower range, though less likely based on current price action.
📌 Got a coin you'd like analyzed? Drop it in the comments.
⚠️ Without proper risk management, you're just a ticking time bomb.
Pernyataan Penyangkalan
Informasi dan publikasi tidak dimaksudkan untuk menjadi, dan bukan merupakan saran keuangan, investasi, perdagangan, atau rekomendasi lainnya yang diberikan atau didukung oleh TradingView. Baca selengkapnya di Persyaratan Penggunaan.
Pernyataan Penyangkalan
Informasi dan publikasi tidak dimaksudkan untuk menjadi, dan bukan merupakan saran keuangan, investasi, perdagangan, atau rekomendasi lainnya yang diberikan atau didukung oleh TradingView. Baca selengkapnya di Persyaratan Penggunaan.