AUDNZD Buy Idea Based On Multi-timeframe Analysis
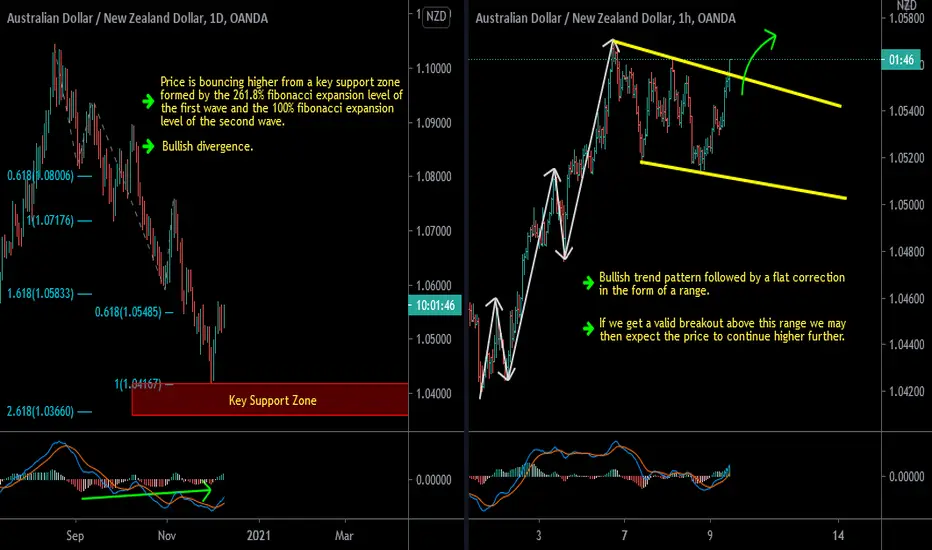
D1 - Price is bouncing higher from a key support zone formed by the 261.8% fibonacci expansion level of the first wave and the 100% fibonacci expansion level of the second wave.
Bullish divergence.
H1 - Bullish trend pattern followed by a flat correction in the form of a range.
If we get a valid breakout above this range we may then expect the price to continue higher further.
Bullish divergence.
H1 - Bullish trend pattern followed by a flat correction in the form of a range.
If we get a valid breakout above this range we may then expect the price to continue higher further.
Catatan
A valid breakout above the range happened as expected and the price moved higher further providing an amazing move to the upside!Pernyataan Penyangkalan
Informasi dan publikasi ini tidak dimaksudkan, dan bukan merupakan, saran atau rekomendasi keuangan, investasi, trading, atau jenis lainnya yang diberikan atau didukung oleh TradingView. Baca selengkapnya di Ketentuan Penggunaan.
Pernyataan Penyangkalan
Informasi dan publikasi ini tidak dimaksudkan, dan bukan merupakan, saran atau rekomendasi keuangan, investasi, trading, atau jenis lainnya yang diberikan atau didukung oleh TradingView. Baca selengkapnya di Ketentuan Penggunaan.